Tuesday, November 25, 2014

Food You Can Grow in Containers

Are you a little short on garden space? Here are some things you can grow in containers. Search online for specific tips and techniques.

Tree fruits

1. Apples can be grown in a container; you can also grow them on the balcony or other small space using a technique called espaliering.
2. Kumquats
3. Avocados
4. Blackberries
5. Blueberries (helpful video from Dave's Nursery)
6. Pomegranate
7. Cherries
8. Figs
9. Pears

Citrus fruits

Citrus trees are good for beginners and are easy to grow indoors.
10. Dwarf oranges
11. Grapefruit
12. Tangerines
13. Meyer lemons
14. Limes

Tropical fruits

Tropical fruits can be easy to grow indoors. (Moss in the City has container tips)
15. Bananas
16. Pineapple
17. Papaya
18. Guavas

Surprises

19. Asparagus (Some say no, but others have had some success with this in containers.)
20. Aloe Vera
21. Strawberries
22. Tea
 23. Quinoa!

Of Course...

24. Tomatoes
25. Summer squash
26. Other squashes, like acorn and pumpkin
27. Hot Peppers
28. Sweet peppers
29. Cucumbers

Melons

Look for compact or bush varieties. Growing vertically on a trellis is also an option.
30. Small cantaloupe
31. Jenny Lind melon (an heirloom cantaloupe)
32. Golden Midget Watermelon

Herbs

Most herbs will to well indoors in containers.
33. Basil
34. Oregano
35. Parsley
36. Rosemary
37. Chives
38. Catnip
39. Thyme
40. Sage
41. Parsley

Leafy Greens

42. Kale
43. Mesclun greens
44. Spinach
45. Swiss chard
46. Lettuces
 47. Mustard greens
48. Collard greens
49. Arugula

Root Vegetables

50. Carrots
51. Beets
52. Potatoes

Other

53. Sprouts
54. More sprouts: mung bean and lentil sprouts
55. Wheat grass
56. Kohlrabi
57. Turnips
58. Rutabagas
59. Celeriac
60. Parsnips
61. Jerusalem Artichoke
62. Sugar snap peas
63. Rhubarb (not ideal in a container, but it can work)
64. Mushrooms (tips online)
65. Pole Beans

Thursday, November 13, 2014

Why Should Christians be Concerned with Industrialized Farming?

From Crosswalk.com:

Industrialized farming produces tons of food. But the methods involved should make every Christian stop and consider just where our food comes from. Are we truly being good stewards of God’s creation? Joel Salatin, owner of Polyface Farms (www.polyfacefarms.com) and popular speaker, thinks Christians must take a good long look at this topic. See the video here: Crosswalk.com

Thursday, October 30, 2014

Strawberries, Onions, and Garlic

Believe it or not, Southern California gardeners, it's time to plant Strawberries, onions, and garlic for successful harvests next year. The following is from Pat Welsh's Southern California Organic Gardening (3rd Edition): Month by Month (a book we highly recommend).
The Secret Lives of Strawberries and Onions. Strawberries and onions seem at first glance to be an unlikely pair to lump together for discussion, but they share certain characteristics. In order to grow an abundant harvest of large, luscious strawberries and premium globe onions, you have to understand some of their innate secrets. Both are regional crops—that is, varieties of each are designed to be grown in certain Plant globe onions only from seeds, never from sets (small bulbs). Plant only such “short-day” (southern) varieties as ‘Grano’,‘Granex’, and ‘Crystal Wax’; put the seeds in the ground between the first and tenth of November or plant these varieties bare root in January). .... Also plant garlic now. Purchase large globes with good-sized sections in any market, or elephant garlic at the nursery or produce market. (It’s a different species, and milder, but grown much the same way.) Break up the garlic cloves and plant them individually, with the points facing up, in fertile soil rich in humus. Plant them in full sun, 4 inches apart and 2 inches beneath the soil surface.

Highly Recommended!
geographical areas and not in others. Both have specific temperature requirements that, for best results, require their being planted during an identical and extremely short slice of time—sometime between November 1 and 10—though they require this schedule for somewhat different reasons. Exhaustive tests by the University of California Agricultural Extension, paid for by strawberry growers, have proven that strawberries planted between November 1 and 10 get winter chill at the precise moment in their growing schedule to trigger fruit production rather than foliage. When planted at the wrong time they’ll put out runners but won’t produce much, if any, fruit. (Watch any professional strawberry growers near you as a good indication of when to plant.) Either plant runners from your own garden that you’ve already prepared as prechilled, bare-root plants (as discussed on page 362) or plant from bare-roots purchased from nurseries now. (See the box on page 383 for planting instructions.) As a general rule, don’t order strawberries, other than alpine varieties, from catalogs, because they usually don’t carry varieties that are adapted to our climate. Strawberries are a highly regional crop—even more so than onions. Just a few hundred miles up the California coast entirely different strawberry varieties are grown, so be sure that you plant a locally adapted variety, such as ‘Camarillo’,‘Douglas’,‘Sequoia’,‘Tioga’, or ‘Tufts’. Onions are photothermoperiodic—that is, they’re sensitive to temperature and also to day length. An onion plant is stimulated to stop making leafy growth and to start making a bulb not so much by temperature as by the lengthening of days, as the sun moves north in spring and summer. Each variety will form a bulb only after it has received a certain number of hours of daylight each day for a certain number of days. However, varieties vary greatly in the number of hours of daylight they need. Accordingly, all onions are categorized into long-day (northern), intermediate-day (central), and short-day (southern) varieties. Long-day varieties, grown in northern states and in Canada, need fourteen to fifteen hours of daylight to make a bulb. Northern European and Alaskan varieties need sixteen hours or more. No long-day varieties can possibly receive enough hours of daylight in Southern California to make a bulb. If you plant them your crop will always fail, and yet you can often find seeds of long-day onions on local seed racks, and almost all onion sets are of long-day types. These sets can be used only for growing scallions (green onions). Here, in order to get the best globe onions, we must plant seeds of short-day (southern) varieties in fall or, alternatively, plant intermediate varieties in late winter. Also, once an onion has reached a certain critical size, which differs by variety, temperatures of between 40° and 50°F will make it go to seed prematurely, or bolt. The way to grow good bulb onions here and avoid bolting is to follow this Rule of Thumb:

Friday, July 18, 2014

How to Plant, Grow, and Harvest Mesclun

When we are buying bags of this from the store for our salads, we refer to this as "weeds" or "salad weeds." There are several seed mixes available on the market. We like Lettuce Baby Mesclun Gourmet Certified Organic Heirloom Seeds from Botanical Interests. But there are plenty of others. By the way, we still call them "weeds."

The following is an excerpt from Pat Welsh's Southern California Organic Gardening (3rd Edition): Month by Month, a book which we highly recommend to our neighbors here in Southern California.


"Mesclun" (pronounced mess-cloon) is the colloquial term for "mixture" in Provence and refers to mixtures of young lettuces and salad greens. Traditional Provencal mescluns contain chervil, arugula, lettuce, and endive in precise proportions. American mescluns and those from northern France include a wide selection of exotic greens and even edible flowers.

  • Purchase ready-made mesclun mixes or individual packages of salad greens for making your own mix. Choices include lettuces, arugula, endives, mustards, purslane, chicory, cresses, parsleys, fennel, escarole, mache (lamb's lettuce), miner's lettuce (Claytonia, perfoliata, Montia perfoliata), and others. (Shepherd's Garden Seeds and The Cook's Garden carry seeds. Addresses are listed on page 307.)
  • Prepare a wide row in full sun. Or plant in a raised bed, half barrel with holes drilled in the bottom, or pots. Dig wide rows or raised beds deeply, mix in a 4-inch-thick layer of well-aged compost or nitrolized soil amendment. Apply organic fertilizer recommended for vegetables according to package directions, work this into the top 6 inches of ground, and rake smooth. For barrels, cover each drainage hole with a piece of broken crockery and fill with potting soil appropriate for vegetables. Mix in 1 gallon of commercial bagged chicken manure and an organic vegetable fertilizer according to package directions. Fill other containers •with the same mix. Water seedbeds and containers deeply and let the ground settle overnight.
  • Divide the seeds into two or three batches so that you can plant successive crops. (Store remaining seeds in a cool, dry place.) Thinly broadcast the first planting of seeds in a block and rake gently into the ground, or cover seeds lightly by sprinkling the ground with fine compost or potting soil. Pat down.
  • Some greens, including mustards, kale, chicories, and certain lettuces, grow larger and more vigorously than others. Plant these separately so you can harvest some when they are young to add to mesclun and let others grow larger for use in salads and other dishes.
  • Sprinkle the bed and bare areas surrounding the bed with a bait labeled for the control of slugs, snails, and cutworms in the vegetable garden. Or use organic controls (as described on page 91). Optional step: Cover the seeded area with floating row cover, such as Reemay, available by sheet or roll at garden centers or through mailorder catalogs. Peg down the edges to protect from wind and birds, or build a lightweight, reusable wooden frame the size of the seeded area. (Use a staple gun to attach the floating row cover to this frame.) Remove row cover when plants are 1 or 2 inches high.
  • Sprinkle daily or twice daily to keep seed moist. Water regularly by drip system, overhead watering, or hand-watering. Continue to control slugs and snails.
  • Begin harvesting by thinning to package directions (pulling up whole plants) when they are 2 to 3 inches tall. When the plants are up 5 or 6 inches, begin regular harvesting by shearing the greens 1 inch above the roots; the plants will regrow and you can continue harvesting for several weeks. Or, for slightly larger plants, 5 to 6 inches tall, harvest by picking individual leaves from the outside edges of plants.
  • Feed the bed once a week with a balanced liquid fertilizer diluted according to package directions. Or, alternatively, apply dry organic fertilizers onto the ground around the plants after harvesting and before rain. When rains aren't adequate, wash the fertilizer into the ground by watering overhead.
  • Plant another patch for future harvests. Meanwhile, your first seeding of mesclun will provide salads for several weeks.

Wednesday, July 2, 2014

10 Reasons to Raise Chickens

We enjoy our chickens very much. Here are some of the reasons why (excerpted from My Pet Chicken Handbook: Sensible Advice and Savvy Answers for Raising Backyard Chickens:

Chickens make great pets. They have personality galore, and they're extraordinarily easy to care for. They're bright, funny, quirky, friendly, loving little balls of feathers-and they're entertaining, too. When you have a flock, you'll find they have their own friends, their own cliques, their own favorite nests. Chickens come in such an array of colors, patterns, shapes, and sizes that some of them look more like exotic tropical birds-or even alien life-forms-than farm animals.

Keeping chickens is a lifestyle choice. Having chickens helps fulfill a positive, back-to-the-farm way of living that's about becoming more sustainable. It's also a way to celebrate local, slow food, and reestablish a constructive connection with your neighbors and your neighborhood.

Raising chickens allows you to have more control over the type of food you put on your table. You want organic? You want non-GMO? You want cruelty-free? These choices are all yours to make when raising your chickens.

Chickens will eat your table scraps and convert them into eggs on the one hand, and fertilizer on the other. If you grow vegetables or flowers, you'll find that composted chicken manure is great for your home garden, adding organic matter and nutrients to the soil. Plus, chicken manure from layers tends to be relatively high in calcium, which is helpful for plants, warding off blossom-end rot on tomatoes, for example.


Chickens will cut down on the number of insects in your yard. Anywhere chickens are allowed to forage, they'll snap up spiders, ticks, beetles, grubs, worms, grasshoppers, and more. They love to dig through lawn clippings and yard waste, too.

The eggs from hens raised with access to your backyard will be tastier and more nutritious! Research shows they're not only higher in omega-3s, beta-carotene, and vitamins A, D, and E, but they're lower in cholesterol and saturated fat. They taste better, too. It's something you can see: All that extra nutrition gives backyard eggs a dark orange yolk-not the pale yellow color you see in store-bought eggs.

You'll be eating really fresh eggs—sometimes just minutes old-as opposed to the eggs you get in a grocery store, which can be 6 weeks old or more.

You'll be giving your children positive values. Just as with other pets, keeping chickens can help kids learn about responsibility. But because chickens give back in such a tangible way-eggs!-your kids can also learn about reciprocity and how the care they provide impacts their pets directly. Once they taste the eggs, they'll also come to learn that store-bought isn't always better. Some things are worth doing yourself.

You'll have control over how humanely your wonderful egg producers are treated—and how healthy and clean their environment is.

Chickens are so easy to care for. No walking, no pooper-scoopers, no grooming, no boarding when you go away; they won't scratch up your furniture or chew your favorite slippers.

Friday, June 6, 2014

Shade Tolerant Veggies and Herbs

If you have a spot in your yard that doesn't get much sun, you could try growing the following veggies there:


  • Lettuce
  • Arugula
  • Spinach
  • Broccoli *
  • Green onions
  • Cabbage *
  • Parsley
  • Sorrel
  • Garlic
  • Mint
  • Collards
  • Endive
  • Cress
  • Cauliflower *
  • Peas *
  • Currants
  • Pak Choy
  • Beets *
  • Kohlrabi *
  • Brussels Sprouts
  • Mustard greens
  • Thyme
  • Coriander
  • Tarragon
  • Radishes
  • Cardamom
  • Potatoes *
  • Rhubarb *
  • Swiss Chard
  • Kale
  • Turnips *
  • Carrots *
  • Sweet potatoes and yams *
  • Gooseberries
  • Cilantro
  • Dill
  • Lemon Balm
  • Strawberries *
  • Beans *
  • Blackberries and raspberries *


These need about 4 hours of direct sun each day (some can get by with even less) as apposed to eight hours for the sun-loving plants. Even sun-loving crops will tolerate light shade, but they'll provide a smaller harvest. These are noted below with an asterisk (*).


Friday, April 11, 2014

Our Newest Additions

First time in the water under mama's watchful eye.
Our brown Muscovy duck brought her babies out of the nest today. There are 27 little balls of fluff!

Anecdotal evidence and our experience indicate that Muscovies are usually better mothers than other ducks. Many say it's best to keep the drakes separate from the ducklings because they may sometimes unintentionally trample ducklings. Be that as it may, our Muscovy drake, Socks, is a great dad.

This brood, however, has been adopted by our Pilgrim gander Westley. His mate, Buttercup, died last year, so he has been rather lonely this spring. Westley has been nervously standing guard over this brood all morning. Poor guy, we need to find him another Buttercup.

Westley helping with the chores --
 "As you wish."
We supplement our ducklings with a chick starter After a few weeks, the ducklings can be switched to a chicken grower feed, although ours will have access to all the tender grass and weeds they want. At about 4 months they'll be ready to harvest, especially if we supplement with a grower feed.

Muscovies are excellent livestock for backyard homesteading, mini-farming purposes.

Buttercup, a Pilgrim goose
While they are often referred to as a duck, they aren't related to the Mallard like the other domestic duck breeds. They have some characteristics of ducks, but are also similar to geese. They don't take to deep water like ducks, though they enjoy having plenty of water to wash in. Like other waterfowl they need water deep enough to submerge their nostrils and eyes to keep them clean. Like ducks, they like to mix their food with water--what a mess in the brooder pens. Muscovies are South American birds that like to roost in trees at night, and have fairly sharp claws that enable them to do so. They're not strong flyers, but they have no trouble clearing our five- and six-foot fences, if we don't remove the flight feathers from one wing.

One thing is for certain, Muscovies are much quieter than either our ducks or our geese. In fact they make no sound except for a rare, short "peep" and a warning "hiss." This is a good animal to have in a close neighborhood. Muscovy drakes weigh up to about 15 pounds and ducks weigh about half of that. They come in a variety of colors, and in our experience color of the offspring is not dependent on the color of the parents.

Muscovies have less fat than Mallard-type ducks. The breast on a Muscovy is large and almost fat-free. We think it tastes very much like beef. In fact, cooked properly and served with a little horseradish sauce, it is reminiscent of prime rib. The darker meat of the Muscovy tastes more like chicken. (Doesn't everything taste more or less like chicken?)

Wednesday, April 2, 2014

April Garden Tasks

  • Give flowers and vegetables a foliar feeding of liquid seaweed or compost tea; spray the liquid nutrients on foliage early in the day before it gets too hot.
  • Plant black-eyed, purple hull and crowder peas, okra, peanuts, sweet potatoes, squash, melons, cucumbers, and corn—all can withstand the heat that will arrive in less than 2 months.
  • Keep planting basil—it loves the warm weather.
  • Keep adding kitchen scraps and grass clippings to your compost pile.
  • Replenish your mulch!
  • If slugs and snails are decimating your plants, collect them in the evening, when you're most likely to spot them.
  • Plant pumpkins, summer squash, melons, and other vegetables that thrive in heat.
  • Every 2 weeks from now until late summer, plant small blocks of bush beans and sweet corn to extend the harvest until frost.
  • Thin fruits on fruit trees to increase their size and keep branches from breaking.
  • Sow seeds of nasturtiums, marigolds, portulaca, amaranthus, salvias, vinca (Catharanthus roseus), sunflowers, and zinnias.
  • Attract beneficial insects to your garden: provide them with their chosen  foods and habitats. Umbelliferae family members such as anise, carrot, caraway, coriander, dill, fennel and parsley, with many tiny flowers arranged in tight umbels, and those in the Asteraceae (Compositae) family, such as black-eyed Susan, goldenrod, and strawflower, with a central disc flowers surrounded by many ray petals, attract many beneficials. Mustard flowers attract lacewings that control aphids and parasitic wasps that keep down cabbage caterpillars and coddling moths.

Saturday, March 15, 2014

Fertilizer Facts

 In our Southern California gardens, March is a great time to fertilize. Plants that are beginning to grow can really use the boost in nutrients: Lawns turn greener. Flowers almost immediately bloom. Veggies grow quickly. Fruit trees set more fruit. Citrus green up and look happy.

To many, especially to those new to gardening, figuring out fertilizers can be a challenge. There are so many different kinds on the market: General purpose, multipurpose,  specialty fertilizers for lawns, shrubs, flowers, for citrus, acid-loving plants, tomatoes, azaleas, and so on--add to this the choices of slow-release, quick release, organic, non-organic, granules, liquids, soluble powders, spikes, stakes, beads, gels, concentrates...yikes! So many choices. We just want to fertilize our plants.

By law, the fertilizer label must show the percentage of nitrogen (N), phosphorus (P; phosphoric acid), and potassium (K; potash). These percentages are listed in order (N-P-K) on the label in large numbers, such as 10-10-10, or 12-4-2. So a 5 pound bag of a leading brand's 24-8-16 fertilizer will deliver 1.2 pounds of nitrogen (24% of 5), 0.4 pounds of phosphorus (8% of 5), and 0.8 pounds of potassium to your garden soil. So that's 2.5 pounds of N, P, and K -- what is the rest of the stuff in the bag? Basically, it is filler, so figure the cost per pound of nitrogen when choosing your store-bought fertilizer.  For example, suppose five pounds of 10-10-10 bag and a 12-4-2 fertilizer costs the same. The 12-4-2 is a better buy, especially if you are adding the fertilizer to the surface of your garden soil (more on this below).

There is persistent garden folklore that says that nitrogen encourages green growth, while phosphorus and potassium encourage flowering and fruit growth. The fact is that all three are necessary for all growth. Also, there are at least a couple dozen other minerals that are necessary in trace amounts for healthy plant growth.

Thirty years ago, Sunset magazine asked researchers at California Polytechnic State University at San Luis Obispo to test various fertilizer formulas on various plants. It turns out that in California's soils, only nitrogen makes a difference in the size and amount of fruit.

Because of the alkalinity of our soil, phosphorus and potassium when added from above the ground do not migrate to the root zone of most plants. Nitrogen, however, moves quite easily with rain and irrigation. Therefore, nitrogen needs to be added a few to perhaps several times during the growing season (depending on rain and watering practices). Phosphorus and potassium should be added at planting time in the bottom of the planting hole, or dug deeply in to the garden bed.

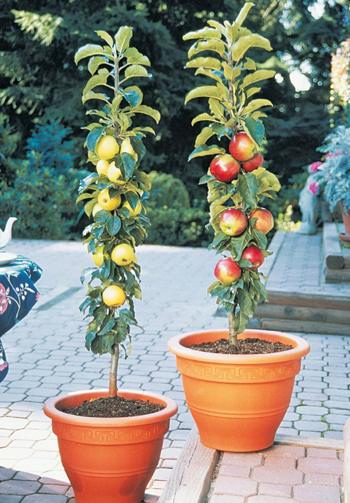
Since potting soil often contains little or no natural soil, plants in containers are more dependent on a balanced fertilizer providing all three main minerals, N-P-K, along with other minerals, added throughout the growing season.


 All that having been said, here is what we do:

First of all, we don't use chemical fertilizers--only organic. We prefer to use our own homemade compost. 

At planting time we add a bit of 10-10-10 or 5-5-5 organic fertilizer (usually this one) and/or compost. We also add trace minerals in the form of Sea-90 at planting time and once during the growing season.

During the growing season we add compost around the plants and mix it into the top layer of soil. For extra nitrogen, we add coffee grounds (N-P-K: 2.0 - 0.3 - 0.3) or tea grounds (4.0 - 0.6 - 0.4). You could instead add blood meal (15 - 1.3 - 0.7) which is a quick release fertilizer or cotton seed meal (7 - 2.5 - 1.5) which releases over time. Cotton seed meal offers us the added benefit of acidifying our alkaline soil, perhaps helping P and K to migrate down into the root zone more effectively.

We also rotate our crops. Legumes (peas, beans, clover) fix nitrogen in the soil as they grow and release more of it into the soil as they decompose, so we plant these in each raised bed every three years or so.

Here is the bottom line from the Sunset article: Since phosphorus, potassium and micro nutrients don't need to be added to the soil frequently, the only element we need to provide with regular fertilizing is nitrogen. For us that means getting the best deal on high-nitrogen fertilizers. We have a constant supply of coffee and tea grounds, and grass clippings, and compost, all for free! Pretty good deal. If you have to buy your fertilizer, get the most nitrogen for the money and follow the label directions for application rates and frequency--too much nitrogen at one time can "burn" your plants.

Additional resource:
52 Weeks in the California Garden by Robert Smaus, pp.137-139.

Thursday, March 6, 2014

March in the Garden

Plant veggies indoors and out.

Plant summer veggies.

Fertilize lawns.

Begin to fertilize citrus and avocado.

Plant cool-season vegetables, such as cabbage, broccoli, spinach, radishes, Asian greens, lettuce, and parsley.

Harden-off tomatoes, peppers, and eggplants by moving them outside, beneath a plastic cover or inside a cold frame. Plant them in the garden after the last possible frost.

Prune away frost-damaged areas on citrus.

Thursday, February 20, 2014

Time to Make Sauerkraut

We have red and white cabbage ready to harvest. Both varieties make good sauerkraut. Red cabbage makes a deep magenta sauerkraut. Mixing white and red, of course, makes pink sauerkraut. 

We like sauerkraut, but we don't care for the vinegary, mushy, stringy kind found in the market in cans or jars. Store-bought, canned sauerkraut has been pasteurized and therefore, the good bacteria (probiotic) and enzymes have been destroyed as has the vitamin C, and other goodies.

We make our own for the better nutrition, but mostly because we like it. It is a little bit sour, and the cabbage is still crisp and tastes like cabbage. If you like sauerkraut at all, or cabbage, once you see how easy it is to make, you'll want to try making some yourself. Once you taste this sauerkraut, you'll want to make some more.

At harvest time, we make a big batch in a crock, but we also make small batches in quart jars when we can find good, organic cabbage (on sale) in the market. Non-organic cabbage that has been sprayed to kill insects or weeds may be slow to ferment or not ferment at all. We use either green or red cabbage or a combination of the two. Here are some fermentation crock options.

All you need to make your own small batch is a head of cabbage, some sea salt, a quart jar with a tight fitting lid, a sturdy bowl, and something with which to pound the cabbage, like a wooden meat tenderizing mallet.

Here's a simple recipe from Nourishing Traditions (page 92):

Sauerkraut

Makes 1 quart

1 medium cabbage, cored and shredded
1 tablespoon caraway seeds
1 tablespoon sea salt
4 tablespoons whey (if not available, use an additional 1 tablespoon salt)

In a bowl, mix cabbage with caraway seeds, sea salt and whey. Pound with a wooden pounder or a meat hammer for about 10 minutes to release juices. Place in a quart-sized, wide-mouth mason jar and press down firmly with a pounder or meat hammer until juices come to the top of the cabbage. The top of the cabbage should be at least 1 inch below the top of the jar. Cover tightly and keep at room temperature for about 3 days before transferring to cold storage. The sauerkraut may be eaten immediately, but improves with age.

Notes: We don't always add the caraway seeds. You can easily make your own whey and in the process, sour cream, or cream cheese. See Making Whey.

Here is an excerpt from a great little book on making sauerkraut and other lacto-fermented veggies we recommend:

"Attention was focused on the nutritional importance of sauerkraut when, in the 18th century, sailors often suffered from scurvy, a vitamin C deficiency. Captain Cook sailed around the world, carrying barrels of sauerkraut, not losing a single man to scurvy during his three-year voyage"

From Making Sauerkraut and Pickled Vegetables at Home: Creative Recipes for Lactic Fermented Food to Improve Your Health (Natural Health Guide), pg. 9.

Remember:  Unlike some others on the Internet, we will never, ever, ever recommend a book, product, practice, or process that we ourselves have not purchased or used consistently and with good, consistent results.


Monday, February 17, 2014

Mini-Ecosystems on Our Mini-Farm

At our place, when our mini-ecosystems are running as they should, the goats, chickens, ducks, worms, catfish and tilapia, all work together to feed each other and us humans.

The chickens like to get to the fresh goat manure as soon as it comes out of the goat. They peck it open to get to undigested seeds and, we presume, parasites. In the process, the chickens scratch to turn the manure into the straw bedding of the goat pen. Thanks to the chickens the composting bacteria begin their work even before we muck out the pen.

The straw and manure from the pen go to one of several compost bins or piles until the composting action cools. In the meantime, we dump kitchen scraps on top of these piles and let the chickens and ducks have at them. They add manure to the piles as the chickens scratch and turn the compost, speeding the decomposition.
 
From there the cooled, but not necessarily completed compost goes either to the garden as mulch or to the worm bin to become vermicompost (worm castings). The worms go to feed the fish, ducks, and chickens. Most of vermicompost goes to the garden, some goes as tea to feed the duckweed, while a bucketful (with worms) goes to the bottom of the empty compost bin ready to receive more muck from the goats.


The fish eat the duckweed, and in moderation and for variety the following: garden and kitchen scraps, chicken and duck manure (and the flora these encourage), worms, chopped offal from the duck and chicken butchering, and raw scrambled eggs.

The ducks and chickens receive the fish offal, greens from garden and the aquaponic grow beds, and duckweed (the ducks like it wet, the chickens like it dry).

Solid fish waste is filtered out of the fish tanks to feed the garden and to help heat up the compost as needed.

Goats get leafy greens from the garden and aquaponic beds.

The humans keep it all moving and healthy. In return we get veggies, fruits, nuts, herbs, eggs, milk, meat, and fish.

Time to Start Seeds Indoors and Out

It’s time to plan our Spring garden. For some gardeners, planning is about all that can be done until the weather warms up. For us, the last frost is expected in mid March or early April.

The first decision to make in garden planning is what to grow. All plants are easy to grow if you know how. Our advice is that you grow only what you plan to eat. If you don't eat beets, don't grow them--at least at first (beets are very good for you, by the way). Start with a few things that you consistently buy at the produce market. Tomatoes are the most popular home-grown vegetable, but if you don't eat tomatoes don't grow them. (A tomato is actually a fruit, but defined by the government for tax purposes as a vegetable; see Nix v. Hedden)

Knowing how long your plants need to mature will help you know when to start them in the garden. Seed packets and catalogs usually give the number of days to harvest from the time you transplant the seedling into the garden. So you work backwards from the time you want to harvest your crops, keeping in mind the frost-free date. 

To raise transplants from seed--like tomatoes, peppers, eggplant, etc.--find out how long the seed needs to germinate (also found on the seed packet or in the catalog) along with the number of days or weeks required for the seedling to be ready to transplant (usually four to six weeks). Add these together and using a calendar, work backwards from your frost-free date. 

Organic Gardening Magazine has a chart to help with your calculations here.

Here is our schedule for starting seeds indoors. Our target date for setting out plants is the first week in April (the last expected frost). This year we're a little behind schedule for some plants, like peppers, eggplant, and lettuce (all of which should have been started two weeks ago). This week, we'll be planting seeds for:

  • Peppers and Eggplant -- 8 to 12 weeks before the last frost.
  • Lettuce -- 8 to 12 weeks before the last frost.  Lettuces can be transplanted into the garden a month or so before the last frost.
  • Cole crops (Broccoli, Cauliflower, Cabbage) -- 6 to 8 weeks before the last frost. These can be transplanted into the garden two weeks or so before the last frost.
  • Tomatoes -- 4 to 6 weeks before the last frost.
  • Cucumbers and Melons -- 2 to 4 weeks before the last frost. That would be the first part of March. These are transplanted out two weeks or more after the last frost. 

We like to grow our plants from seed for at least two reasons. First, we can more easily get seeds for the varieties we want to grow (Pennsylvania Dutch Crookneck Squash, for example). Second, we choose open pollinated and heirloom varieties (not usually available from the nurseries as transplants) so that we can save seeds from year to year. 

However, if you are new to gardening, you may want to wait until the weather warms up and buy plants from the nurseries or garden shops. Nurseries tend to stock only tried-and-true varieties. These will be ready to set out in the garden, are disease resistant, suited to your area, and in most cases will not appear on store shelves until it is time to plant them, give or take a couple of weeks, depending on the weather (frost). If you choose to start seeds, we suggest you start with varieties that germinate easily: basil, broccoli, Brussels sprouts, cabbage, cauliflower, chives, leeks, lettuce, onions, peppers, and tomatoes. 

Our favorite online seed catalogs:

Seed Savers Exchange http://www.seedsavers.org/
Territorial Seed Company http://www.territorialseed.com/

Both of these offer printed catalogs available upon request. 

Territorial Seed Co. has pretty good online "Growing Guides" for each variety of veggie. Although just about every online or print seed catalog offers information on how to grow various varieties, some have more detailed information than others. Park Seeds (http://parkseed.com/vegetables/c/vegetables/) has on most of their detail pages a "Growing Information" tab that offers planting and growing instructions, tips, special considerations, potential pests and solutions, and so on for each variety.

Our favorite book on starting plants from seed is The New Seed Starter's Handbook by Nancy Bubel. It's main sections include: Starting Seeds Indoors, Moving Plants Outdoors, Special Techniques and Situations, Saving Seeds and Making Further Plans, and an Encyclopedia of Plants to Grow from Seed (the info you need to grow each variety of garden plant). 

Starting Seeds Indoors

  1. Gather your materials. Get your seed flats, milk cartons cut in half down the middle, small pots, or what ever it is you're going to plant your seeds in. You'll also need some potting soil or seed starter soil mix (recommended over potting soil), or make your own mix with equal parts sharp sand, peat moss, and perlite or vermiculite.
  2. Prepare your work space. Put down some newspaper or other suitable cover on your work surface. You're going to spill some potting soil.
  3. Review seed packets and make labels for your plantings. Popsicle sticks, strips cut from plastic milk jugs, ready made labels from the garden store, or simply a label taped on the side of the flat will do. Oh, and don't forget your seeds. If you're new to starting seeds and identifying seedlings, labels are must. If you have lots of garden experience, you'll know that a super-hot pepper plant looks the same as a mild-hot pepper plant. It is very easy to confuse plantings in similar looking flats or pots. Labels are a must.
  4. Prepare the medium. Use a watering can or a spray bottle to moisten the potting soil or seed starting mix. It should be damp to the touch but not soggy. If you start with moist soil, you will not have to water your seeds once you after you plant them. There is enough moisture in the soil to sprout the seeds. If you are planting very fine seeds, even the finest mist can dislodge your seeds and cause them all to clump together in the corners and along the edges, making separating the seedlings for replanting difficult if not impossible.
  5. Containers to use for starting seeds indoors. Some ready-
    made, some re-purposed.
  6. Prepare the containers.  Remember this planting is only temporary. As soon as your seedlings have their second set of leaves, you can move them to individual pots or packs (although you could start with these keeping in mind that they will use more starting mix). Fill your container with moistened starter mix and press it down gently. Top it off and press again so that the mix is within a half inch of the top.  Airflow, and in some cases light, is important to seed germination. A planting surface too far below the rim of the container can interfere with these.
  7. Plant the seeds. If you're using a small container (like the bottom two inches of a plastic milk jug), you can scatter the seeds over the entire surface of the planting medium. If you're using a nursery flat, you can place the seeds on the surface in rows, spacing the seeds according to size (tiny seeds at least an eighth of an inch apart, medium seeds a half inch, and large seeds an inch). Remember that you are going to be transplanting the seedlings later. Separating the roots of seedlings planted too close together can be difficult if not impossible without damaging the plant. If you're using a pack with cells, put a couple of seeds in each cell. The extras can be thinned later by snipping them off with small scissors.
  8. Cover the seeds. Except for the very finest seeds or those few varieties that need light to germinate (the seed packet or catalog will tell) which can simply be pressed into the medium, the seeds will need to be covered with more starting medium. A general rule of thumb is to cover the seed to a depth 3 to 4 times its size. For example, a seed that is one-eighth inch in size would be covered with three-eighths to one-half inches of cover. We tend to stay toward the shallower depth when starting seeds indoors. This cover layer of mix or vermiculite does not need to be wet. It will absorb water from the moist layer below. You will not have to water your seeds until after they sprout. There will be plenty of moisture available for them.
  9. Cover the container. If you're using ready-made seed starting trays, put the covers on and your seeds are ready to go. If you're using re-purposed containers, you can place a piece of damp newspaper or burlap over the surface of your container. Or (our favorite), you can slip the whole container into a plastic bag, or use a plastic sheet (trash bag), tucking the edges under your container. You could possibly use aluminum foil, but we have never tried this. Clear plastic allows you to see what is happening without letting out the moisture around your seeds.
  10. Put the container in a warm place. Your seeds have moisture and they will need warmth to germinate. Put the covered container in a warm place, but keep it out of the sun! You don't want to steam your seeds or new seedlings. The top of the fridge might be a good place. Near the stove in the kitchen. A shelf over the dryer in the laundry room or a shelf near the water heater. We've sprouted seedlings on the dining room table and on the patio table (in warm weather). Most seeds will sprout more quickly at temperatures between about 72 and 86 degrees, but have a good germination rate at around 70. In other words, a comfortable temperature for you will be good for your seeds.
  11. Watch and wait. As soon as most of the seedlings emerge, they will need their plastic tent removed and to be moved to a sunny place, not necessarily in direct sunlight at first. In a future post, we'll talk about what happens next.   

Wednesday, February 5, 2014

Easy Crops to Grow

If you've never tried gardening before, and want to give it a try, but you just don't know how to get started, we have a suggestion for you: Start by growing something you really like to eat! Find out what the requirements are for that veggie or fruit and see what you would need to grow it in your current situation--will grow indoors? in a container on the patio or balcony? in a small garden bed with or with out vertical support? And so on. Some plants will be more difficult than others. Here are a few of the easier ones that adapt well to smaller spaces:
 
Tomatoes are America's number one favorite to grow. There’s nothing like a just-picked, perfectly ripe tomato. They are especially easy when you start from plants. If you get that bumper crop, they're easy to store: can, freeze, or dry them.

Spinach is a cool season crop that can be planted in very early spring, late fall, or in our part of the world, even in winter. Don’t get greedy and wait for the leaves to get their biggest--they will probably be bitter. Cut off the outer leaves while they are still young for sweeter spinach and a longer harvest--the inner leaves will continue to produce.

Green beans are quite easy to grow and will give you a big crop (if you grow the pole varieties)! If you grow more than you can eat fresh, they freeze well. They're going to need a tripod or trellis to grow on, but they don't take up a lot of horizontal space in the garden.

Onions grow well in well-drained, loose, soil rich in nitrogen; a container or raised bed is perfect. Mulch will help retain moisture and discourage  weeds.

Strawberries are surprisingly hardy and are unbelievably sweet when they are perfectly ripe. This perennial needs full sun and to be keep well-weeded.

Peppers can be ripened for different lengths of time to get a range of colors and flavors. They all start out green and turn colors (red for most varieties) as they ripen.
Carrots and Beets -- root vegetables that thrive in loose, well-drained soil. They will take a while to mature, but they are worth it. They like sun.


Radishes grow well in the cool seasons and do well even in soil that isn’t the greatest. The germinate quickly and some varieties are ready to harvest in three weeks after sprouting. Kids and adults with patience issues do well with these. However, if you don't care for them in your salad, don't grow too many if any.

Tuesday, January 28, 2014

Our Approach to Everyday Living

  1. Grow. Grow food. Garden. Raise Animals and Fish for Meat.
  2. Cook. Prepare real, whole foods (in the form God created them), from scratch, using traditional methods.
  3. Clean. Life and cooking from scratch are messy. Accept responsibility. Clean up using as few toxic words and chemicals as possible.
  4. Love. Love the Lord and his creation. Love life; be content; be gracious.
  5. Learn. Learn about God, self, and nature. Teach others. Expand horizons. Admit mistakes and make changes.
     
  6. Repeat. Repeat 1-5. Thankfully, today is short and tomorrow’s a new day.

Thursday, January 23, 2014

Free Composting Workshop


Saturday, February 1, 2014
10:00 AM 

The Water Conservation Garden

12122 Cuyamaca College Dr W
(Next to Cuyamaca College)
El Cajon, CA (map)
In our 2-hour, interactive workshops you will learn the basics of backyard composting and vermicomposting (composting with worms). Using trial-tested advice and interactive demonstrations, our expert educators will teach you all you need to know to get started with a bin that fits your needs and lifestyle. Held throughout the County, there is sure to be a workshop near you! We invite you to join us to learn more about composting and how it can benefit your garden, home, and community.
Compost bins will be sold at the end of the workshop with subsidized prices for Unincorporated County residents so don't forget to bring cash or a check.

To register for this workshop, please call the Solana Center at (760) 436-7986 ext. 222, or visit http://www.solanacenter.org/forms/water-conservation-garden-composting-workshop-feb-1

Contact us: (760) 436-7986

Lawn to Garden

Do you have a sunny patch of lawn you could transform into a garden spot? The easiest way to convert a lawn into a garden does not employ even as much as a single shovel. Sheet mulching—a simple technique that involves layering organic materials right over the turf—kills the grass and leaves develops a garden bed with rich soil. A considerable amount of organic debris goes into the bed construction, so that stockpile of autumn leaves and yard trimmings, composted manure, and garden waste will come in handy. If you don't have said stockpile, you can go to the garden center and buy compost in bags.

Mark off the area of lawn where your garden bed will be.  Scalp the grass within the outline with a lawn mower. Add your 2 x 6 or 2 x 8 frame(s) if you use them. A four foot by eight foot framed raised bed will grow a lot of veggies!

Spread a 2-inch layer of compost or composted manure over the bed. This helps encourage microbial activity in the soil and speeds decomposition. Moisten the compost well.

Cover the compost with overlapping pieces of cardboard to smother the underlying vegetation and prevent light from reaching any weed seeds. Soak the cardboard with water.

Spread a 2-inch layer of compost over the cardboard and top it with up to 18 inches of mixed organic material (grass clippings, leaves, straw, seaweed, garden debris, farmyard manure, or more compost).

Include vegetable and fruit scraps and coffee grounds from the kitchen in the layers of organic matter.You can add kitchen scraps over the next few weeks by burying them in the bed. Alternate locations within the bed (don't bury scraps in the same place twice) to provide good coverage of nutrients, and to hasten decomposition.

For vegetable beds, top with a couple of inches of straw if you have it or about 6 inches of grass clippings. For ornamental beds, top with 4 inches of wood chips. In arid climates, water the bed as needed to keep the materials moist but not soaking wet. Soil microbes and earthworms will work to decompose the organic materials, including the cardboard and sod. The kitchen scraps, compost, and moisture will attract them, or you can add them to your bed.  (Get over to the sporting goods store and get some red wigglers, go fishing, bring back the left over worms to add to your garden bed!)

By the time temperatures allow planting out (the frost-free date, give or take a week or two), your bed should be ready.


Time to Start Seeds Indoors

It’s time to plan our Spring garden. For some gardeners, planning is about all that can be done until the weather warms up.

The first decision to make in garden planning is what to grow. All plants are easy to grow if you know how. Our advice is that you grow only what you plan to eat. If you don't eat beets, don't grow them--at least at first (beets are very good for you, by the way). Start with a few things that you consistently buy at the produce market. Tomatoes are the most popular home-grown vegetable, but if you don't eat tomatoes don't grow them. (A tomato is actually a fruit, but defined by the government for tax purposes as a vegetable; see Nix v. Hedden)

For us, the last frost is expected in mid March or early April. My grandfather, whose real-sized farm was only a few miles from our mini-farm, used to plant corn every two weeks or so starting in mid to late March so that he would be sure to have corn to harvest for celebrations on the 4th of July and on thru the summer. He planted Golden Bantam (as do we) which is ready to harvest about 80 days after planting.

Knowing how long your plants need to mature will help you know when to start them in the garden. Seed packets and catalogs usually give the number of days to harvest from the time you transplant the seedling into the garden. So you work backwards from the time you want to harvest your crops, keeping in mind the frost-free date. 

To raise transplants from seed--like tomatoes, peppers, eggplant, etc.--find out how long the seed needs to germinate (also found on the seed packet or in the catalog) along with the number of days or weeks required for the seedling to be ready to transplant (usually four to six weeks). Add these together and using a calendar, work backwards from your frost-free date. 

Organic Gardening Magazine has a chart to help with your calculations here.

Here is our schedule for starting seeds indoors. Our target date for setting out plants is the first week in April (the last expected frost). We'll start planting seeds for:

  • Peppers and Eggplant -- 8 to 12 weeks before the last frost. That would be now.
  • Lettuce -- 8 to 12 weeks before the last frost. That would be now. Lettuces can be transplanted into the garden a month or so before the last frost.
  • Cole crops (Broccoli, Cauliflower, Cabbage) -- 6 to 8 weeks before the last frost. That would be the first part of February. These can be transplanted into the garden two weeks or so before the last frost.
  • Tomatoes -- 4 to 6 weeks before the last frost. That would be mid February.
  • Cucumbers and Melons -- 2 to 4 weeks before the last frost. That would be the first part of March. These are transplanted out two weeks or more after the last frost. 

We like to grow our plants from seed for at least two reasons. First, we can more easily get seeds for the varieties we want to grow (Pennsylvania Dutch Crookneck Squash, for example). Second, we choose open pollinated and heirloom varieties (not usually available from the nurseries as transplants) so that we can save seeds from year to year. 

However, if you are new to gardening, you may want to wait until the weather warms up and buy plants from the nurseries or garden shops. Nurseries tend to stock only tried-and-true varieties. These will be ready to set out in the garden, are disease resistant, suited to your area, and in most cases will not appear on store shelves until it is time to plant them, give or take a couple of weeks, depending on the weather (frost). If you choose to start seeds, we suggest you start with varieties that germinate easily: basil, broccoli, Brussels sprouts, cabbage, cauliflower, chives, leeks, lettuce, onions, peppers, and tomatoes. 

Our favorite online seed catalogs:

Seed Savers Exchange http://www.seedsavers.org/
Territorial Seed Company http://www.territorialseed.com/

Both of these offer printed catalogs available upon request. 

Territorial Seed Co. has pretty good online "Growing Guides" for each variety of veggie. Although just about every online or print seed catalog offers information on how to grow various varieties, some have more detailed information than others. Park Seeds (http://parkseed.com/vegetables/c/vegetables/) has on most of their detail pages a "Growing Information" tab that offers planting and growing instructions, tips, special considerations, potential pests and solutions, and so on for each variety.


Our favorite book on starting plants from seed is The New Seed Starter's Handbook by Nancy Bubel. It's main sections include: Starting Seeds Indoors, Moving Plants Outdoors, Special Techniques and Situations, Saving Seeds and Making Further Plans, and an Encyclopedia of Plants to Grow from Seed (the info you need to grow each variety of garden plant). 

Starting Seeds Indoors

  1. Gather your materials. Get your seed flats, milk cartons cut in half down the middle, small pots, or what ever it is you're going to plant your seeds in. You'll also need some potting soil or seed starter soil mix (recommended over potting soil), or make your own mix with equal parts sharp sand, peat moss, and perlite or vermiculite.
  2. Prepare your work space. Put down some newspaper or other suitable cover on your work surface. You're going to spill some potting soil.
  3. Review seed packets and make labels for your plantings. Popsicle sticks, strips cut from plastic milk jugs, ready made labels from the garden store, or simply a label taped on the side of the flat will do. Oh, and don't forget your seeds. If you're new to starting seeds and identifying seedlings, labels are must. If you have lots of garden experience, you'll know that a super-hot pepper plant looks the same as a mild-hot pepper plant. It is very easy to confuse plantings in similar looking flats or pots. Labels are a must.
  4. Prepare the medium. Use a watering can or a spray bottle to moisten the potting soil or seed starting mix. It should be damp to the touch but not soggy. If you start with moist soil, you will not have to water your seeds once you after you plant them. There is enough moisture in the soil to sprout the seeds. If you are planting very fine seeds, even the finest mist can dislodge your seeds and cause them all to clump together in the corners and along the edges, making separating the seedlings for replanting difficult if not impossible.
  5. Containers to use for starting seeds indoors. Some ready-
    made, some re-purposed.
  6. Prepare the containers.  Remember this planting is only temporary. As soon as your seedlings have their second set of leaves, you can move them to individual pots or packs (although you could start with these keeping in mind that they will use more starting mix). Fill your container with moistened starter mix and press it down gently. Top it off and press again so that the mix is within a half inch of the top.  Airflow, and in some cases light, is important to seed germination. A planting surface too far below the rim of the container can interfere with these.
  7. Plant the seeds. If you're using a small container (like the bottom two inches of a plastic milk jug), you can scatter the seeds over the entire surface of the planting medium. If you're using a nursery flat, you can place the seeds on the surface in rows, spacing the seeds according to size (tiny seeds at least an eighth of an inch apart, medium seeds a half inch, and large seeds an inch). Remember that you are going to be transplanting the seedlings later. Separating the roots of seedlings planted too close together can be difficult if not impossible without damaging the plant. If you're using a pack with cells, put a couple of seeds in each cell. The extras can be thinned later by snipping them off with small scissors.
  8. Cover the seeds. Except for the very finest seeds or those few varieties that need light to germinate (the seed packet or catalog will tell) which can simply be pressed into the medium, the seeds will need to be covered with more starting medium. A general rule of thumb is to cover the seed to a depth 3 to 4 times its size. For example, a seed that is one-eighth inch in size would be covered with three-eighths to one-half inches of cover. We tend to stay toward the shallower depth when starting seeds indoors. This cover layer of mix or vermiculite does not need to be wet. It will absorb water from the moist layer below. You will not have to water your seeds until after they sprout. There will be plenty of moisture available for them.
  9. Cover the container. If you're using ready-made seed starting trays, put the covers on and your seeds are ready to go. If you're using re-purposed containers, you can place a piece of damp newspaper or burlap over the surface of your container. Or (our favorite), you can slip the whole container into a plastic bag, or use a plastic sheet (trash bag), tucking the edges under your container. You could possibly use aluminum foil, but we have never tried this. Clear plastic allows you to see what is happening without letting out the moisture around your seeds.
  10. Put the container in a warm place. Your seeds have moisture and they will need warmth to germinate. Put the covered container in a warm place, but keep it out of the sun! You don't want to steam your seeds or new seedlings. The top of the fridge might be a good place. Near the stove in the kitchen. A shelf over the dryer in the laundry room or a shelf near the water heater. We've sprouted seedlings on the dining room table and on the patio table (in warm weather). Most seeds will sprout more quickly at temperatures between about 72 and 86 degrees, but have a good germination rate at around 70. In other words, a comfortable temperature for you will be good for your seeds.
  11. Watch and wait. As soon as most of the seedlings emerge, they will need their plastic tent removed and to be moved to a sunny place, not necessarily in direct sunlight at first. In a future post, we'll talk about what happens next.   

Thursday, January 16, 2014

Goat's Milk Soap

We like to make our own soap, sometimes using goat's milk. The following tutorial clearly shows the technique we use to make our soap, although our recipe is a little different.

Tutorial: How to Make Goat’s Milk Soap

by Lindsay Proctor

The products we use on our body should be just as safe and clean as the food we put into our bodies. One of the best ways to make sure of this is to make your own bath and body products. Deodorant, sunscreen, skin balm and lotion bars, lip balm, tooth powder, and soap are all simple things that are easy to make at home — so you know exactly what you’re putting on your largest organ, your skin.

When we brought home our first two dairy goats....Read more here.

Monday, January 13, 2014

Health Benefits of Eating Grassfed Animals

The Health Benefits of Grass Farming

Author: Jo Johnson
Why Grassfed is Best!

Consumers have been led to believe that meat is meat is meat. In other words, no matter what an animal is fed, the nutritional value of its products remains the same. This is not true. An animal's diet can have a profound influence on the nutrient content of its products.

The difference between grainfed and grassfed animal products is dramatic.

First of all, grassfed products tend to be much lower in total fat than grainfed products. For example, a sirloin steak from a grassfed steer has about one half to one third the amount of fat as a similar cut from a grainfed steer.

Read more at AmericanGrassfedBeef.com....

Saturday, January 11, 2014

67 Self-Sufficiency How-To's

  1. Raising Ducks 101 
  2. How to Save Seeds
  3. Preparing for Cold and Flu Season With Probiotics
  4. Ultimate Chicken Care Guide
  5. How to Process Meat Rabbits
  6. How to Make Reusable Food Wrap
  7. How to Make a Clothespin Bag From an Old Pair of Jeans
  8. How to Flash Freeze Green Beans
  9. Restoring and Seasoning Rusted Cast Iron
  10. How to Can Peaches
  11. 5 Favorite Ways to Repurpose Feed Sacks
  12. Predator Proofing Your Coop
  13. How to Make Tomato Powder
  14. Making Venison Jerky
  15. How to Trim Your Goat’s Hooves
  16. Permaculture: Integrate Rather Than Segregate
  17. How to Build a Chicken Tractor
  18. How to Braid Garlic
  19. Aquaponics Intro
  20. Canning Butternut Squash + pressure canning primer
  21. Canning Grape Juice and Jelly
  22. Cinnamon Coconut Roasted Pumpkin Seeds
  23. DIY Elderberry Syrup
  24. DIY Flock Block
  25. Home Brew on the Homestead
  26. Homemade Sweetened Condensed Milk
  27. How to Store Onions
  28. Mulch Cover Crops for Organic Gardens
  29. Nourishing Soups for Cold and Flu Season
  30. Satsuma orange farm
  31. Stinging Nettle and Its Health Benefits
  32. 5 Awesome Apple Dips
  33. 10 Benefits and Uses of Apple Cider Vinegar
  34. Putting Chickens to Work in the Fall Garden
  35. Curing Olives
  36. Homemade Applesauce
  37. Extend Your Growing Season
  38. DIY Inexpensive Easy Food Drying Rack 
  39. How to be an apartment homesteader
  40. How to Fix Soil Nutrient Deficiencies
  41. Seed Saving 101
  42. How to Prepare for Butchering
  43. Freezing Tomatoes
  44. 10 Best Herbs to Grow Indoors
  45. Canning Tomato Soup
  46. Root Cellars 101
  47. How to Make Apple Jelly
  48. How to Can Peach Salsa
  49. How to Grow Garlic
  50. Growing Garlic
  51. How to Freeze Mixed Vegetables
  52. How to Butcher a Whole Pig for a Pig Roast
  53. How to Make Hard Cider
  54. 9 ways young kids can help in the kitchen
  55. Basics of traditional foods
  56. Best cold and flu fighters
  57. Direct composting
  58. Financial realities of homesteading
  59. Food storage
  60. Heating with wood
  61. Homemade chicken broth
  62. Homemade citrus extract
  63. How to make buttermilk
  64. How to make infusions, decoctions, tinctures
  65. Natural stove cleaners
  66. Rural homesteading: four things to know
  67. Teaching children food preservation