Tuesday, November 25, 2014

Food You Can Grow in Containers

Are you a little short on garden space? Here are some things you can grow in containers. Search online for specific tips and techniques.

Tree fruits

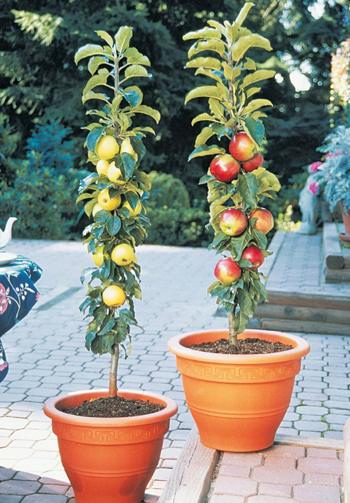
1. Apples can be grown in a container; you can also grow them on the balcony or other small space using a technique called espaliering.
2. Kumquats
3. Avocados
4. Blackberries
5. Blueberries (helpful video from Dave's Nursery)
6. Pomegranate
7. Cherries
8. Figs
9. Pears

Citrus fruits

Citrus trees are good for beginners and are easy to grow indoors.
10. Dwarf oranges
11. Grapefruit
12. Tangerines
13. Meyer lemons
14. Limes

Tropical fruits

Tropical fruits can be easy to grow indoors. (Moss in the City has container tips)
15. Bananas
16. Pineapple
17. Papaya
18. Guavas

Surprises

19. Asparagus (Some say no, but others have had some success with this in containers.)
20. Aloe Vera
21. Strawberries
22. Tea
 23. Quinoa!

Of Course...

24. Tomatoes
25. Summer squash
26. Other squashes, like acorn and pumpkin
27. Hot Peppers
28. Sweet peppers
29. Cucumbers

Melons

Look for compact or bush varieties. Growing vertically on a trellis is also an option.
30. Small cantaloupe
31. Jenny Lind melon (an heirloom cantaloupe)
32. Golden Midget Watermelon

Herbs

Most herbs will to well indoors in containers.
33. Basil
34. Oregano
35. Parsley
36. Rosemary
37. Chives
38. Catnip
39. Thyme
40. Sage
41. Parsley

Leafy Greens

42. Kale
43. Mesclun greens
44. Spinach
45. Swiss chard
46. Lettuces
 47. Mustard greens
48. Collard greens
49. Arugula

Root Vegetables

50. Carrots
51. Beets
52. Potatoes

Other

53. Sprouts
54. More sprouts: mung bean and lentil sprouts
55. Wheat grass
56. Kohlrabi
57. Turnips
58. Rutabagas
59. Celeriac
60. Parsnips
61. Jerusalem Artichoke
62. Sugar snap peas
63. Rhubarb (not ideal in a container, but it can work)
64. Mushrooms (tips online)
65. Pole Beans

Thursday, November 13, 2014

Why Should Christians be Concerned with Industrialized Farming?

From Crosswalk.com:

Industrialized farming produces tons of food. But the methods involved should make every Christian stop and consider just where our food comes from. Are we truly being good stewards of God’s creation? Joel Salatin, owner of Polyface Farms (www.polyfacefarms.com) and popular speaker, thinks Christians must take a good long look at this topic. See the video here: Crosswalk.com

Thursday, October 30, 2014

Strawberries, Onions, and Garlic

Believe it or not, Southern California gardeners, it's time to plant Strawberries, onions, and garlic for successful harvests next year. The following is from Pat Welsh's Southern California Organic Gardening (3rd Edition): Month by Month (a book we highly recommend).
The Secret Lives of Strawberries and Onions. Strawberries and onions seem at first glance to be an unlikely pair to lump together for discussion, but they share certain characteristics. In order to grow an abundant harvest of large, luscious strawberries and premium globe onions, you have to understand some of their innate secrets. Both are regional crops—that is, varieties of each are designed to be grown in certain Plant globe onions only from seeds, never from sets (small bulbs). Plant only such “short-day” (southern) varieties as ‘Grano’,‘Granex’, and ‘Crystal Wax’; put the seeds in the ground between the first and tenth of November or plant these varieties bare root in January). .... Also plant garlic now. Purchase large globes with good-sized sections in any market, or elephant garlic at the nursery or produce market. (It’s a different species, and milder, but grown much the same way.) Break up the garlic cloves and plant them individually, with the points facing up, in fertile soil rich in humus. Plant them in full sun, 4 inches apart and 2 inches beneath the soil surface.

Highly Recommended!
geographical areas and not in others. Both have specific temperature requirements that, for best results, require their being planted during an identical and extremely short slice of time—sometime between November 1 and 10—though they require this schedule for somewhat different reasons. Exhaustive tests by the University of California Agricultural Extension, paid for by strawberry growers, have proven that strawberries planted between November 1 and 10 get winter chill at the precise moment in their growing schedule to trigger fruit production rather than foliage. When planted at the wrong time they’ll put out runners but won’t produce much, if any, fruit. (Watch any professional strawberry growers near you as a good indication of when to plant.) Either plant runners from your own garden that you’ve already prepared as prechilled, bare-root plants (as discussed on page 362) or plant from bare-roots purchased from nurseries now. (See the box on page 383 for planting instructions.) As a general rule, don’t order strawberries, other than alpine varieties, from catalogs, because they usually don’t carry varieties that are adapted to our climate. Strawberries are a highly regional crop—even more so than onions. Just a few hundred miles up the California coast entirely different strawberry varieties are grown, so be sure that you plant a locally adapted variety, such as ‘Camarillo’,‘Douglas’,‘Sequoia’,‘Tioga’, or ‘Tufts’. Onions are photothermoperiodic—that is, they’re sensitive to temperature and also to day length. An onion plant is stimulated to stop making leafy growth and to start making a bulb not so much by temperature as by the lengthening of days, as the sun moves north in spring and summer. Each variety will form a bulb only after it has received a certain number of hours of daylight each day for a certain number of days. However, varieties vary greatly in the number of hours of daylight they need. Accordingly, all onions are categorized into long-day (northern), intermediate-day (central), and short-day (southern) varieties. Long-day varieties, grown in northern states and in Canada, need fourteen to fifteen hours of daylight to make a bulb. Northern European and Alaskan varieties need sixteen hours or more. No long-day varieties can possibly receive enough hours of daylight in Southern California to make a bulb. If you plant them your crop will always fail, and yet you can often find seeds of long-day onions on local seed racks, and almost all onion sets are of long-day types. These sets can be used only for growing scallions (green onions). Here, in order to get the best globe onions, we must plant seeds of short-day (southern) varieties in fall or, alternatively, plant intermediate varieties in late winter. Also, once an onion has reached a certain critical size, which differs by variety, temperatures of between 40° and 50°F will make it go to seed prematurely, or bolt. The way to grow good bulb onions here and avoid bolting is to follow this Rule of Thumb:

Friday, July 18, 2014

How to Plant, Grow, and Harvest Mesclun

When we are buying bags of this from the store for our salads, we refer to this as "weeds" or "salad weeds." There are several seed mixes available on the market. We like Lettuce Baby Mesclun Gourmet Certified Organic Heirloom Seeds from Botanical Interests. But there are plenty of others. By the way, we still call them "weeds."

The following is an excerpt from Pat Welsh's Southern California Organic Gardening (3rd Edition): Month by Month, a book which we highly recommend to our neighbors here in Southern California.


"Mesclun" (pronounced mess-cloon) is the colloquial term for "mixture" in Provence and refers to mixtures of young lettuces and salad greens. Traditional Provencal mescluns contain chervil, arugula, lettuce, and endive in precise proportions. American mescluns and those from northern France include a wide selection of exotic greens and even edible flowers.

  • Purchase ready-made mesclun mixes or individual packages of salad greens for making your own mix. Choices include lettuces, arugula, endives, mustards, purslane, chicory, cresses, parsleys, fennel, escarole, mache (lamb's lettuce), miner's lettuce (Claytonia, perfoliata, Montia perfoliata), and others. (Shepherd's Garden Seeds and The Cook's Garden carry seeds. Addresses are listed on page 307.)
  • Prepare a wide row in full sun. Or plant in a raised bed, half barrel with holes drilled in the bottom, or pots. Dig wide rows or raised beds deeply, mix in a 4-inch-thick layer of well-aged compost or nitrolized soil amendment. Apply organic fertilizer recommended for vegetables according to package directions, work this into the top 6 inches of ground, and rake smooth. For barrels, cover each drainage hole with a piece of broken crockery and fill with potting soil appropriate for vegetables. Mix in 1 gallon of commercial bagged chicken manure and an organic vegetable fertilizer according to package directions. Fill other containers •with the same mix. Water seedbeds and containers deeply and let the ground settle overnight.
  • Divide the seeds into two or three batches so that you can plant successive crops. (Store remaining seeds in a cool, dry place.) Thinly broadcast the first planting of seeds in a block and rake gently into the ground, or cover seeds lightly by sprinkling the ground with fine compost or potting soil. Pat down.
  • Some greens, including mustards, kale, chicories, and certain lettuces, grow larger and more vigorously than others. Plant these separately so you can harvest some when they are young to add to mesclun and let others grow larger for use in salads and other dishes.
  • Sprinkle the bed and bare areas surrounding the bed with a bait labeled for the control of slugs, snails, and cutworms in the vegetable garden. Or use organic controls (as described on page 91). Optional step: Cover the seeded area with floating row cover, such as Reemay, available by sheet or roll at garden centers or through mailorder catalogs. Peg down the edges to protect from wind and birds, or build a lightweight, reusable wooden frame the size of the seeded area. (Use a staple gun to attach the floating row cover to this frame.) Remove row cover when plants are 1 or 2 inches high.
  • Sprinkle daily or twice daily to keep seed moist. Water regularly by drip system, overhead watering, or hand-watering. Continue to control slugs and snails.
  • Begin harvesting by thinning to package directions (pulling up whole plants) when they are 2 to 3 inches tall. When the plants are up 5 or 6 inches, begin regular harvesting by shearing the greens 1 inch above the roots; the plants will regrow and you can continue harvesting for several weeks. Or, for slightly larger plants, 5 to 6 inches tall, harvest by picking individual leaves from the outside edges of plants.
  • Feed the bed once a week with a balanced liquid fertilizer diluted according to package directions. Or, alternatively, apply dry organic fertilizers onto the ground around the plants after harvesting and before rain. When rains aren't adequate, wash the fertilizer into the ground by watering overhead.
  • Plant another patch for future harvests. Meanwhile, your first seeding of mesclun will provide salads for several weeks.

Wednesday, July 2, 2014

10 Reasons to Raise Chickens

We enjoy our chickens very much. Here are some of the reasons why (excerpted from My Pet Chicken Handbook: Sensible Advice and Savvy Answers for Raising Backyard Chickens:

Chickens make great pets. They have personality galore, and they're extraordinarily easy to care for. They're bright, funny, quirky, friendly, loving little balls of feathers-and they're entertaining, too. When you have a flock, you'll find they have their own friends, their own cliques, their own favorite nests. Chickens come in such an array of colors, patterns, shapes, and sizes that some of them look more like exotic tropical birds-or even alien life-forms-than farm animals.

Keeping chickens is a lifestyle choice. Having chickens helps fulfill a positive, back-to-the-farm way of living that's about becoming more sustainable. It's also a way to celebrate local, slow food, and reestablish a constructive connection with your neighbors and your neighborhood.

Raising chickens allows you to have more control over the type of food you put on your table. You want organic? You want non-GMO? You want cruelty-free? These choices are all yours to make when raising your chickens.

Chickens will eat your table scraps and convert them into eggs on the one hand, and fertilizer on the other. If you grow vegetables or flowers, you'll find that composted chicken manure is great for your home garden, adding organic matter and nutrients to the soil. Plus, chicken manure from layers tends to be relatively high in calcium, which is helpful for plants, warding off blossom-end rot on tomatoes, for example.


Chickens will cut down on the number of insects in your yard. Anywhere chickens are allowed to forage, they'll snap up spiders, ticks, beetles, grubs, worms, grasshoppers, and more. They love to dig through lawn clippings and yard waste, too.

The eggs from hens raised with access to your backyard will be tastier and more nutritious! Research shows they're not only higher in omega-3s, beta-carotene, and vitamins A, D, and E, but they're lower in cholesterol and saturated fat. They taste better, too. It's something you can see: All that extra nutrition gives backyard eggs a dark orange yolk-not the pale yellow color you see in store-bought eggs.

You'll be eating really fresh eggs—sometimes just minutes old-as opposed to the eggs you get in a grocery store, which can be 6 weeks old or more.

You'll be giving your children positive values. Just as with other pets, keeping chickens can help kids learn about responsibility. But because chickens give back in such a tangible way-eggs!-your kids can also learn about reciprocity and how the care they provide impacts their pets directly. Once they taste the eggs, they'll also come to learn that store-bought isn't always better. Some things are worth doing yourself.

You'll have control over how humanely your wonderful egg producers are treated—and how healthy and clean their environment is.

Chickens are so easy to care for. No walking, no pooper-scoopers, no grooming, no boarding when you go away; they won't scratch up your furniture or chew your favorite slippers.

Friday, June 6, 2014

Shade Tolerant Veggies and Herbs

If you have a spot in your yard that doesn't get much sun, you could try growing the following veggies there:


  • Lettuce
  • Arugula
  • Spinach
  • Broccoli *
  • Green onions
  • Cabbage *
  • Parsley
  • Sorrel
  • Garlic
  • Mint
  • Collards
  • Endive
  • Cress
  • Cauliflower *
  • Peas *
  • Currants
  • Pak Choy
  • Beets *
  • Kohlrabi *
  • Brussels Sprouts
  • Mustard greens
  • Thyme
  • Coriander
  • Tarragon
  • Radishes
  • Cardamom
  • Potatoes *
  • Rhubarb *
  • Swiss Chard
  • Kale
  • Turnips *
  • Carrots *
  • Sweet potatoes and yams *
  • Gooseberries
  • Cilantro
  • Dill
  • Lemon Balm
  • Strawberries *
  • Beans *
  • Blackberries and raspberries *


These need about 4 hours of direct sun each day (some can get by with even less) as apposed to eight hours for the sun-loving plants. Even sun-loving crops will tolerate light shade, but they'll provide a smaller harvest. These are noted below with an asterisk (*).